Introduction
In MyTimetable you can view and download your timetable, and connect your timetable to calendar applications such as Microsoft Outlook, Google Calendar, Apple Calendar or a calendar app on your smartphone.
You can compile your own timetable by joining several timetables into one timetable. You can also choose the corresponding group for each course. Sometimes your timetables are added automatically, for example based on your enrolments. Depending on your institution's settings, you might not have access to all features.
This help page explains how MyTimetable works. If you have any questions, please refer to this help page first. If you're experiencing any (technical) issues or incorrect timetables, please refer to Troubleshooting.
Logging in
You can log in to MyTimetable. Once you are logged in, your preferences are saved and you can connect your timetable to calendar applications. When you are using MyTimetable as a guest, your preferences won't be saved. So we advise you to log in by clicking Log in and entering your user name and password.
(Visually) impaired users
We recommend users with a (visual) impairment to use the mobile view. This view has been adapted to work with screen readers and braille display, and is keyboard operated.
Feature overview
The below screenshot shows an overview of the MyTimetable web page. Hover the mouse over the image to find out about the application's features. Click a highlighted element to quickly go to the corresponding part of the help page.
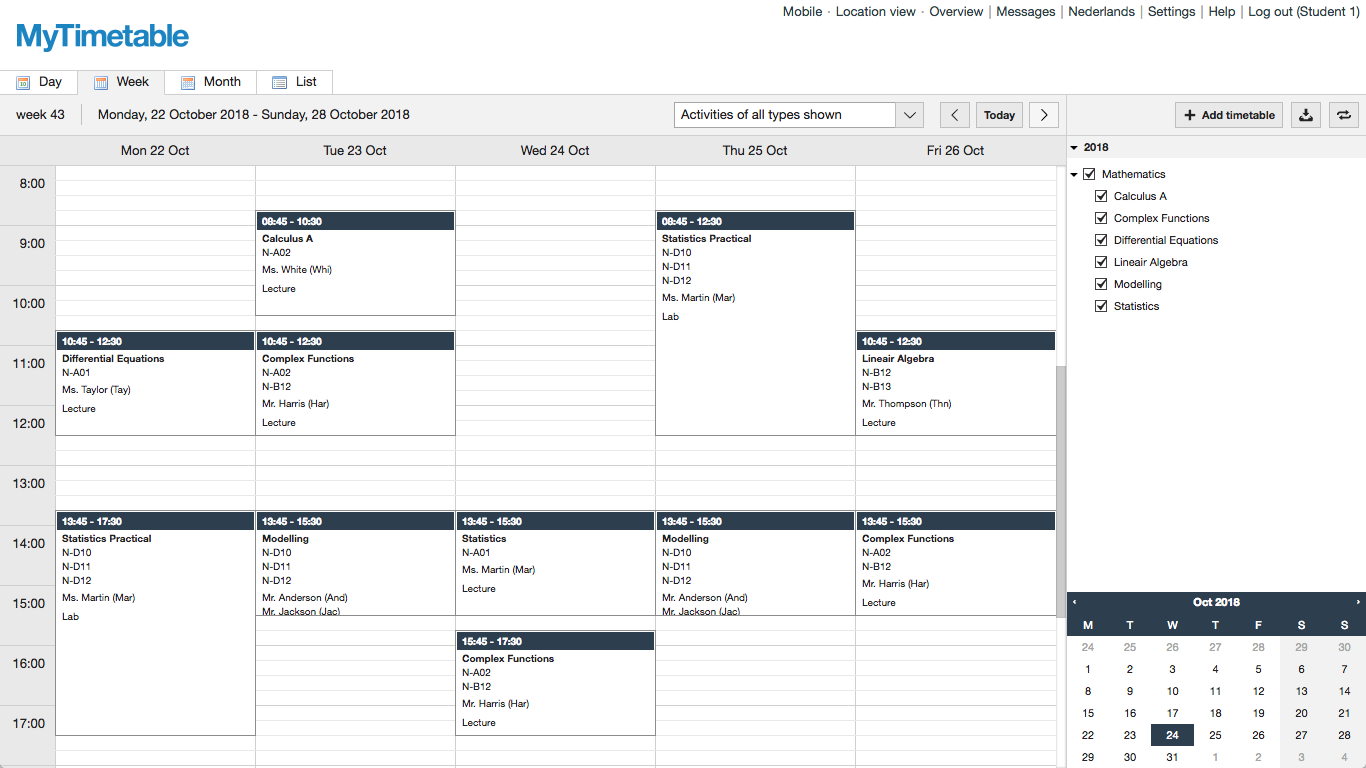
- Activities in your timetable.
- List of timetables that make up your personal timetable.
- Tabs to switch between various timetable views.
- Navigation arrows to browse to the next day, week or month.
- Button to add timetables to your personal timetable.
- Button to download or print your timetables.
- Button to connect your timetable to a calendar application or your smartphone or tablet.
- Calendar to choose a different date.
Consulting timetables
To view a timetable it should first be added to the list on the right of the screen. That way, you can create your own personal timetable from different timetables (for example from groups, courses or students), which will collectively display in the calendar.
Please see below for the various possibilities. Depending on your institution's settings, you might not have access to all features.
Adding timetables
You can add various timetables (from a group or course, for example) to create your personal timetable. To add a timetable, click the button Add timetable and select the type of timetable you want to add. You might be able to choose from several years of study. In that case, first, choose a year of study from this menu and then the preferred timetable type.
In the displayed window, you can find timetables of your preference.
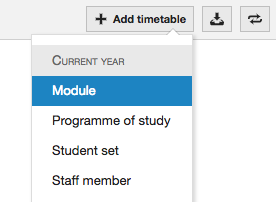 Choose a type of timetable to add.
Finding timetables
You can start searching by entering a query. For example: a query could be a (part) of the course or group name. After you have entered a query in the search field, a list of matched timetables appears. Please note that you usually need to enter a few letters before search results are displayed. You can find the minimum amount of letters above the search field for the query.
Based on the type of chosen timetable, you can further refine your search results using the drop-down menus. Here you can select a department or programme of study. If you use these menus, you are not required to enter a query.
When you have found the correct timetable, check the box in front of the title and click Add timetables. After you have added the timetables, click Close. You can also add multiple timetables at once by checking several boxes.
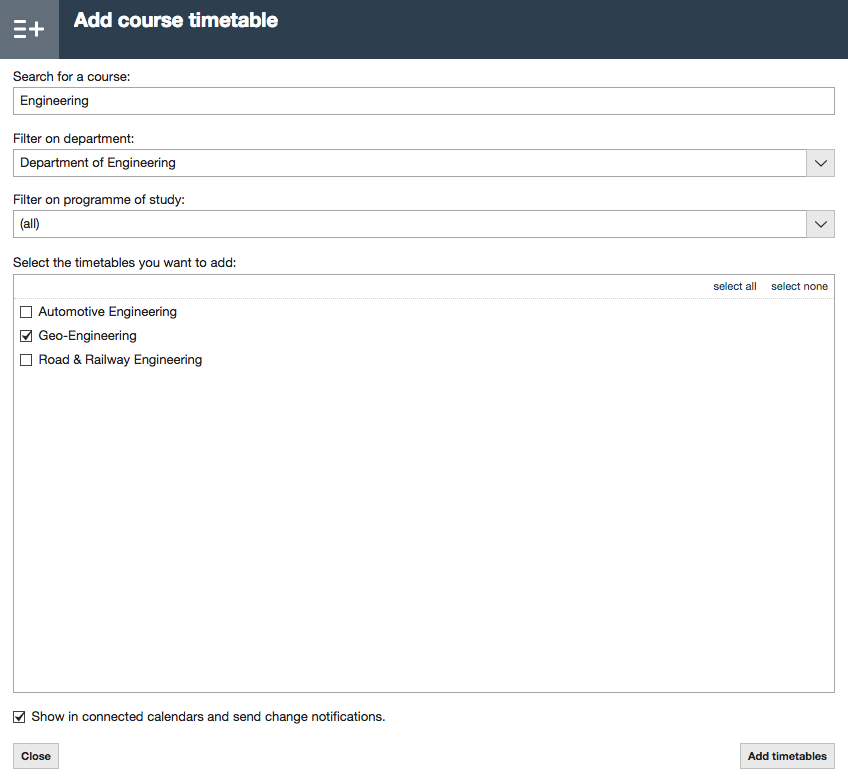 Window for finding and adding timetables.
Choosing groups
Some timetables allow you to choose a group per course. This way, you only see activities that belong to your group. When possible, a group selection screen will display automatically after clicking Add timetables.
Maximum number of enabled timetables
When you add many timetables of the same type, they can't be enabled all at once. This prevents the application becoming too slow to work with. If you choose too many timetables, new timetables are still added but they will be disabled and a message will show. You can enable a disabled timetable in the list of all added timetables. For this, you need to disable another timetable of the same type. Please refer to Personalizing your timetable for more information.
Viewing timetables
You can view your timetable in several ways: there is a day, week, month and list view, which you can switch using the tabs in the top of the window. In each view you can click an activity to view details.
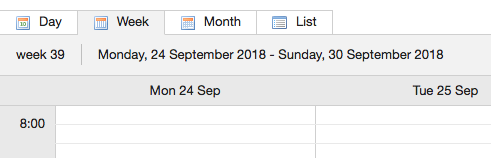 Tabs to switch between several views.
Selecting a different date
The various views contain three navigation buttons in the top bar. Depending on the chosen view, you can use this to browse the days, weeks or months. The button Today brings you back to the current day quickly. Do you want to quickly jump to a specific date? Use the calendar in the lower right of the screen.
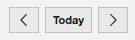 Navigation buttons.
Saturday and Sunday
Saturday and Sunday are only shown when activities have been scheduled on one of these days.
List view options
The list view contains additional options in the drop-down menu you can access using the  button in the top bar.
The Combine per day of week option combines all selected weeks into one weekly timetable.
An additional Weeks column will be displayed, showing in which weeks the activity takes place.
button in the top bar.
The Combine per day of week option combines all selected weeks into one weekly timetable.
An additional Weeks column will be displayed, showing in which weeks the activity takes place.
The Overlapping activities option allows you to highlight overlapping activities or to display overlapping activities only. This way you can quickly see whether you can attend all activities.
Publication data and draft activities
It could be that your timetable doesn't yet contain all of your activities or that certain activities are not yet final. Your institution decides when timetables are published and when activities are final. Please note: Final timetables might still be changed.
Personalizing your timetable
On the right of the screen, you find a list of all timetables comprising your personal timetable. Here you can enable and disable timetables by checking or unchecking the box. Some timetables can't be disabled however, for example when a timetable has been added automatically.
You can use the  button to configure various timetable options.
Hover your mouse over the timetable to display the menu button.
Sometimes this menu allows you to choose a group or filter a timetable to only show activities of a certain type, for example exams.
The exact available features are determined by your institution's settings.
This means you might not have access to all features.
button to configure various timetable options.
Hover your mouse over the timetable to display the menu button.
Sometimes this menu allows you to choose a group or filter a timetable to only show activities of a certain type, for example exams.
The exact available features are determined by your institution's settings.
This means you might not have access to all features.
You can also choose which timetables you would like to synchronise with your smartphone, tablet or calendar application. Please refer to Own timetables for more information.
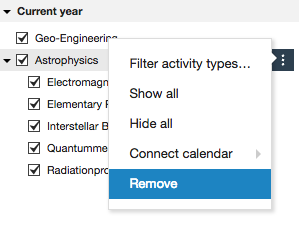
Removing timetables or restoring defaults
On the right of the screen, you find a list of all timetables comprising your personal timetable.
Hover your mouse over the timetable and click the button.
Click Remove to remove a timetable you previously added.
Click Restore defaults to restore an automatically added timetable to its defaults, undoing any customisations you made to it.
This can also be done for a group of timetables (e.g., a study year) at once, using the button to the right of the group name.
Some timetables can't be removed, for example when a timetable has been added automatically. Course timetables that are part of a different timetable, can't be deleted separately either. You can hide activities from this timetable by unchecking the checkbox in front of the course.
 Delete a timetable.
Room timetables
Room and building timetables are available via the location view. The location view works similarly to the regular timetable view. In this separate view, you can also view a room's availability. A list view sorted by location is also available.
To go to location view, click Location view from the menu in the top right of the window. By clicking Timetable view from the same menu, you return to the regular timetable view.
Overview
The overview displays all available timetables per timetable type. This view can be used to quickly view one timetable. To go to the overview, click Overview from the menu in the top right of the window.
In overview, you can choose the timetable type you wish to find in the menu bar on top of the page. Next, a list of available timetables is displayed. By clicking View timetable, only the chosen timetable is displayed in MyTimetable.
When logged into MyTimetable, the option Show personal timetable is displayed in the lower right of the screen. By clicking this option, both your personal timetable and the timetable you just selected will be visible. The Add to my timetable button allows you to add the chosen timetable to your personal timetable.
Mobile website
MyTimetable has a mobile website optimized for small screens. When viewing MyTimetable on your mobile phone, the mobile website is displayed automatically. Go to https://rooster.universiteitleiden.nl/m to view the mobile site.
Adding timetables
You can add various timetables (from a group or course, for example) to create your personal timetable.
To add a timetable, click the menu button  and pick Show your timetables.
Then click the + button and search the timetable you want to add.
You might be able to choose from several years of study.
In that case, first, choose a year of study from this menu and then the preferred timetable type.
and pick Show your timetables.
Then click the + button and search the timetable you want to add.
You might be able to choose from several years of study.
In that case, first, choose a year of study from this menu and then the preferred timetable type.
To the desktop view
You can navigate to the desktop view by clicking the menu button and pick Go to desktop site.
Please note: The desktop view is not suited for smartphones. When you use a tablet, the usability depends on the size of the screen.
Connecting smartphone or tablet
Please login to view detailed instructions for mobile devices.
Connecting calendar applications
Please login to view detailed instructions for calender applications.
Own timetables
Please login to view detailed instructions.
Downloading and printing
You can download your timetable in several formats.
The various options are available in the Download menu  .
.
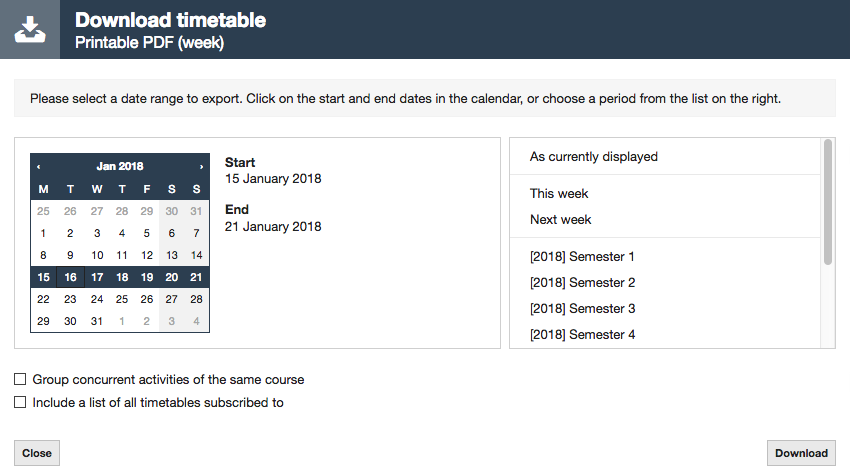
Printable PDF file
If you want to print your timetable, you can choose a PDF file. The timetable will be displayed in A4 format for easy printing. You can choose a weekly view, in which each week is displayed on a separate page, or you can choose a list view, in which all activities are listed one below the other.
- Click the Download button .
- Choose Printable PDF (week) or Printable PDF (list).
- A window is displayed. Here, choose the date range you want to display in the file.
- If desired, you can also set options such as grouping of activities or including a list of names of the timetables.
- If you've chosen a list, the option Combine per day of week is available, which combines all selected weeks into one weekly timetable. An additional Weeks column will be displayed, showing in which weeks the activity takes place.
- Click the Download button.
 Options in the download window.
Microsoft Excel file
You can download your timetable in list format as a Microsoft Excel file.
- Click the Download button .
- Choose Microsoft Excel.
- A window is displayed. Here, choose the date range you want to display in the file.
- If desired, you can also set options such as grouping of activities or including a list of names of the timetables.
- Click the Download button.
CSV file
You can download your timetable in list format as a CSV file. CSV is a format for tabular data using plain text and a column delimiter.
- Click the Download button .
- Choose CSV.
- A window is displayed. Here, choose the date range you want to display in the file.
- If desired, you can also set options such as grouping of activities or including a list of names of the timetables.
- Finally, you can choose a column delimiter. If you can't open the file, you can try again with a different delimiter.
- Click the Download button.
iCalendar file
You can open an iCalendar-, or iCal file for short, using calendar applications such as Microsoft Outlook or Apple Calendar. These files contain the timetable as it is the moment the file is created. The timetable will not automatically update when it is changed.
- Click the Download button .
- Choose iCalendar.
- A window is displayed. Here, choose the date range you want to display in the file.
- If desired, you can also set options such as grouping of activities or warnings before the start of an activity.
- Click the Download button.
Accessibility
Please refer to the accessibility statement for more information regarding the accessibility of this website.
Frequently asked questions
My timetable is empty. Why?
Check whether you have selected the correct date in the calendar in the bottom right of the screen. Also check whether you have added your timetable(s) to MyTimetable and whether your timetables are enabled. If timetables are automatically displayed based on enrolments, please check your enrolments.
Check that you're in the correct view. MyTimetable contains a timetable view and a location view. You can switch between these views by clicking Timetable view or Location view in the top right of the menu.
My timetable is showing up empty when I return to MyTimetable. What is wrong?
Your preferences are only saved when you are logged in. Make sure you are logged in.
There are activities missing in my timetable. Why?
Check whether you've personalized your timetable correctly, for example by verifying whether you have disabled certain courses or chose the correct group for a course. Maybe you applied filters in MyTimetable. In that case, check whether the filters are set correctly.
How do I know if any activities are scheduled during the weekend?
Saturday and Sunday are automatically shown when activities have been scheduled on one of these days.
All my courses start too early or too late. How do I fix this?
Your time zone might be set incorrectly. Click Settings in the top right of the screen. Check your time zone settings.
I cannot add a timetable because the check box is greyed out. How is this possible?
The check box is grey because the timetable has already been added. You can only add a timetable once.
How often will my connected timetable update in my smartphone, tablet or calendar application?
This depends on the calendar application or app you're using.
- On an Android smartphone, your calendar is updated about every 6 hours.
- On an iPhone and iPad, your calendar is updated hourly by default.
- The Microsoft Outlook desktop application updates your calendar hourly by default.
- Apple Calendar allows you to decide how many times your calendar is updated. Take this into account when connecting your calendar!
- Google Calendar updates your calendar about every 6 hours.
- The Web version of Microsoft Outlook updates your calendar about every 3 hours.
When in doubt whether your connected timetable has been updated, you can check https://rooster.universiteitleiden.nl for an updated timetable anytime.
Do I need to reconnect my timetable to my smartphone, tablet or calendar-application when I have added or removed timetables?
No, you only need to connect once per device or calendar application.
My connected timetable is not being updated anymore or has missing activities. What should I do?
First check whether the correct timetables are being synchronised. To do this, please refer to Own timetables. You can also refer to question 4 to check how many times your connected timetable is being updated.
If this doesn't solve the problem, we recommend reconnecting your smartphone, tablet or calendar application. To do this, follow these steps:
- Disconnect your timetable from your smartphone, tablet or calendar application.
- Reconnect your timetable with your smartphone, tablet or calendar application.
My connected timetable contains too many activities. What should I do?
Check whether the correct timetables are being synchronised. To do this, please refer to Own timetables.
My activities appear multiple times on my smartphone, tablet or calendar application. What is wrong?
Make sure your timetable is not connected to your device or calendar application multiple times. Please refer to the instructions per device or calendar application on how to disconnect your timetable.
Someone else connected my personal timetable to a smartphone, tablet or calendar application. How do I revert this?
Each connected personal timetable contains a unique code. You can reset this code by clicking Settings in the top right of the screen and opening the tab Applications. Next, click the link Click here to reset your personal links.
Please note: The old connections to your smartphone, tablet or calendar application won't be working anymore. Please reconnect your smartphone, tablet or calendar application.
Can I choose which timetables should be synchronised with my connected calendar?
Yes, this is possible. Please refer to the Own timetables section for more information.
Troubleshooting
First refer to frequently asked questions to check whether your question has already been answered. If you're still experiencing any (technical) issues or incorrect timetables, please contact us for support.
You can contact the ISSC Helpdesk via +31 71 527 8888 or helpdesk@issc.leidenuniv.nl.
For questions about the timetable itself, please contact the person responsible for the timetable at the education concerned.
Privacy
By using this website of Leiden University, data will be shared with Semestry. This may be personal data. Semestry will take appropriate technical and organisational measures to secure the personal data. Semestry is the processor of this data and will therefore not carry out processing operations without permissions from Leiden University, unless required due to legal obligations. Requests for inspection, correction and deletion of personal data should be directed to Leiden University. For more information, see the privacy policy.